Thursday, January 31, 2013

Extraordinary Three Cheese Dip | Game Day Recipe

Superbowl Sunday is almost here... did you get your stuff for the Microwavable Caramel Popcorn Recipe I shared with you? Remember - it's easy peasy! And because I've made it very clear how easy it is to make, I've been asked to bring it into work... sometimes my blabbing gets me in trouble. :o)

Anyways, what's a Superbowl party without some sort of dip? If I'm going to recommend one, it's definitely the Extraordinary Three Cheese Dip stolen and slightly renamed from Epicure. I believe I've shared it with you before, oh yes back when I wrote this "Favorite's Friday"... Oh look, there's the caramel popcorn recipe too! Oops!


Extraordinary Three Cheese Dip Recipe 
(a la Epicure - is that right?)

250 g light cream cheese (I'm trying to make this healthy)
1/2 cup grated cheddar cheese
1/2 cup grated mozzarella cheese
1 cup light mayonnaise (trust me the light stuff tastes just as good)
1 tbsp Epicure's Cheese, Chive & Bacon dip mix
1 tbsp Epicure's Lemon Dilly dip mix
1 tbsp Epicure's 3 Onion dip mix

Preheat oven to 350ºF. Mix all ingredients well and place in a baking dish. Heat for 20 to 30 minutes or heated through. That is it... I repeat... easy peasy once again.


Yum! Doesn't that look delicious? Of course it does - and it was. I even got to make it in my new Epicure baker:


I love the color of it. The hubby and I want dishes this color so baaaaaad. They have some at Pottery Barn (Cambria in turquoise oh and we want stone too) that we are waiting to scoop up. Every time we have the chance though, they are out of some of the pieces so we decide not to get them yet.

Hmm... well that is it - that's all I have for today. I apologize if you get addicted to the dip... well not really but I tried.


Wednesday, January 30, 2013

DIY | Dining Room Table Turned Desk

A few weeks back I shared my before and after dining room chairs. I believe I also mentioned something about the table and having a plan for it... well, here it is...


diy | dining room table turned desk


The hubby turned it into a desk in only 30 minutes - 30 minutes of freezing his butt off in the garage.... thank you hubby!! Anyways, here's what you need to do.


1. Grab a table like the one below.
{Please excuse the pic, the hubbies office isn't as nice as mine... ha!}


2. Next, he removed the legs, flipped it over and cut it to the desired size.


3. And Voila! Here you have it. Okay not quite yet.
After cutting, put the long strip back on and then measure the two end pieces.
Screw it all back together and you're done!

Now that's why it only took 30 minutes. Phew! I hope those instructions helped? Next time I'll hang around a little longer to get more pictures {my fault!}.


diy table from an old dining room table


What do you think? Isn't it cute. I quickly staged it for your viewing {isn't that what bloggers do?}, before shipping it back to my mothers to save her more space... and not to mention, it fits her quaint country styled home perfectly!


I linked up at:

Miss Mustard Seed
Shaken Together 

Tuesday, January 29, 2013

Microwaved Caramel Popcorn | Game Day Recipe

Are you ready for Superbowl Sunday? I may be Canadian... but I have a hubby that loves football. Although his favorite team didn't make it this year... yes he's a Cowboy's fan... I know he'll still have the television reserved for the beloved game.

So, why not plan a few recipes for the big day like our fellow friends to the South do? Here's one that might just make the list... easy, delicious addictive and did I mention easy? A game day recipe you shouldn't leave out, microwaved caramel popcorn!


microwaved caramel popcorn recipe.


Microwaved Caramel Popcorn Recipe 

source: all recipes

16 cups popcorn
1 cup brown sugar
1/2 cup margarine
1/4 cup light corn syrup
1/2 tsp salt
1 tsp vanilla extract
1/2 tsp baking soda

Place your popped popcorn aside in a large bowl.

Next combine the brown sugar, margarine, light corn syrup, salt and vanilla in a microwavable glass dish. Heat for 3 minutes in the microwave. Remove, stir well and heat for another 1 1/2 minutes. Remove again and add the baking soda. (Watch it expand... my favorite part.)

Now pour syrup of the popcorn and coat well. Place popcorn in the microwave for 70 seconds. Remove, stir again and place back in microwave for 70 more seconds. Now, you can spread it across a waxed sheet of paper... or you can do what I did and stir occasionally while it cools to prevent it from sticking together. (Okay I let it stick together... and then I made a huge mess when I tried to break it and it flew everywhere in the air... these pretty pictures are not a representation of my cooking skills...)


caramel popcorn - game day recipe


That's it... Mmm... Enjoy!


Monday, January 28, 2013

The Earrings are For Sale!

Alright, here's the deal. The earrings are ready and they're for sale. They just haven't hit the Etsy Shoppe yet because we are heading away on vacay soon! Translation... I don't want to list them, get a whole bunch of interest, and then have to shut down the shoppe for the week we're away.

What does this mean for you?

You get first dibs and a little bit of a deal if you want to buy from the first batch (or two) before they make the store.


Here's a snapshot of the what the earrings look like (see the ones for sale here). If you see a pair you MUST have, let me know... email me, comment below... Facebook me? If you see two pairs that you must have... even better for me for you... you'll get a deal.

On Etsy they are going to sell for $8 each plus shipping OR two for $14 plus shipping. If you buy before they go into the Etsy Shoppe (you have approximately 2 - 3 weeks)... you can get them $8 each plus shipping OR two for ONLY $12 plus shipping. (Shipping in Canada is $2.50).

So what'ya say?

They will be sold on a first come first serve basis... and while I'm away... a delayed response may occur - SORRY!

Keep in touch with my Facebook page as I will post the ones for sale in the Album - First Come, First Gets Earrings - Pre-Etsy Opportunity. When you pick and I respond... we will chit chat and I will invoice you through PayPal and then they will happily land in your mailbox.

If I don't hear back from you within 48 hours... I must surrender your selection to other folks.

Okay, deal... deal.

1, 2, 3... go shop!

Oh and thanks for supporting martha.anne and kinda making this thing a reality! :o)


Saturday, January 26, 2013

Our "Reno" List for 2013...

And beyond! (Don't tell the hubby I said so.) Although we'd love to do everything in one year, and that's what we're used to doing... we should must put the brakes on and spread these out over the next few years. Anyways, here's the list, big and small, that I decided to put together so we can really see what's ahead of us:


- fireplace mantel in the current future formal living room
- redo the family room in the basement (so we can actually have a formal living room)
- finish putting new windows in throughout the house
- put backsplash up in the kitchen (so I can FINALLY reveal it!)
- hire someone to paint all ceilings
- finish master ensuite / walk-in closet
- redo main floor bathroom
- redo / finish building basement bathroom
- redo two bedrooms in the basement
- rip apart backyard deck and make a stone patio
- create an outdoor kitchen (this is not my idea!! can you guess who wants this?)
- put in a pool and possibly hot tub
- put up a fence
- put a fireplace in, in the basement
- add storage shelves to the utility room
- add patio door in the foyer
- okay, put all new doors in the foyer
- landscape everywhere (this is definitely the hubby's job...)
- redo all house siding
- insulate garage

Oh my... the list is never ending... I think it's done now. PHEW! {wipes sweat from brow just thinking about what's ahead of us}

If you feel the urge to do any renovations, we can definitely spare a few. Come on over and I'm sure the hubby will grill you something nice on the smoker! And... I estimate the list to be done by 2018... anyone want to put in a wager?


Thursday, January 24, 2013

Cozy.Cottage.Cute | Another Great Blog

I've stumbled upon another great blog - Cozy.Cottage.Cute. Actually I have a list of them I'm waiting to share, but I couldn't resist this one. I love the way she writes, in fact, I have writer's envy... and her about us page is to die for, it definitely has me reconsidering mine!

Enough rambling... okay not yet... I've just started perusing and something keeps bringing me back to this dresser she created with numbers on it. It's absolutely adorable and I think it would look great in my office space for storage.


numbered dresser | cozy.cottage.cute


Isn't it adorable? Here's the before and after...


numbered dresser before & after | cozy cottage cute


I have a dresser in worse shape waiting for a makeover... I might just do this! Anyways, go check out Cozy.Cottage.Cute and let me know what you think about the dresser... is it cute or what?


cozy.cottage.cute


Oh, before I forget... in other news, if you haven't seen my Facebook posts... the earrings are nearly ready. Okay, they are... I just need to take some pictures and post them on the Etsy Shoppe! Are you as excited as I am?


Tuesday, January 22, 2013

Shop Local | Stevie Lee Photography

I love, love, love Stevie Lee Photography. While I still wait for an excuse to get some photos done, I thought I'd share her Valentine's Day Special with you guys. (I'm sorry if you're not local)


Stevie Lee Photography


Get a 30 minute session, 5 digital images and a photo print release for ONLY $35!

Be sure to visit and like Stevie Lee Photography on Facebook and while you're at it... tell your friends about this great Valentine's Day promotion.


Monday, January 21, 2013

DIY | Valentine's Day Banner

I'm not one for Valentine's Day... Okay I kinda am. But, the hubby considers it a Hallmark Holiday and prefers to surprise me because he wants to, not because someone said he should. So usually we decide to go out for dinner and find something we both want. Last year we went to San Francisco and called it our Valentine's Day present. This year, we are going to Niagara Falls for a week and having a seafood cookout the night of. I'm completely okay with this. :D

diy valentine's day banner. (by martha.anne)


While we may celebrate Valentine's Day a little differently, I decided a little banner project would still look cute. I didn't want to go all out, so I did it with things from around the house and it cost me $0. After putting it together, I thought how cute, I think I'll share. :o)


DIY Valentine's Day Banner

you'll need.

newspaper
scrap cardboard
string
scissors
pencil
tape
glue
hole punch


here's what you do.

1. Draw a heart on the scrap cardboard
and cut it out so you can trace it.

2. Trace hearts onto newspaper and cut them out.
(Leave newspaper folded to cut more at once.)

3. Glue three hearts together so that they are thicker.

4. Punch two holes in hearts - one at the top of each side.

5. Twist together string and feed it through the holes.
(I used hemp and embroidery thread.)

6. If desired, tape string to the back of hearts to keep them in place.


VOILA! Valentine's Day Banner complete.


There you have it. I completed my first holiday banner and on a budget - zip, nil, zero dollars! It doesn't get any better than that and it looks absolutely adorable above my working space:

diy valentine's day banner. (by martha.anne)


I linked up here:

More the Merrier Monday


Shaken Together


Friday, January 18, 2013

The Ensuite Has Started...

It's not much to show you, but we have started. All of the pine has been removed and we have moved the clothes. Here's what it looks like for now... (I'm sort of pouting because I miss my shelves already!)


(See what it looked like before: Before and After - The Master Bedroom)


I drew up a plan for the layout:


And, here are some ideas of what things will look like...

I would like the shower to look like this one or no wood and just glass. The white subway tile would be perfect to keep the space light and airy.


pinterest.


The sink will look like this one... maybe. I'm still trying to decide if it is too minimal or just right for the size of the space. If we go with this design, I would like both pieces of wood extended to make a counter space area.


Pinterest.


The closet will be a walk-in with lots of hanging space and built in storage. I would like some shelves and drawers, along with this great jewelry space:


Pinterest.


The door between the bathroom and closet will be a pocket door - a must to save space. But, the door that enters the ensuite is currently a lot bigger than a regular door opening. Instead of framing it in, I really want a barn door - either like this one or one with just one big door.


Pinterest.


Eek! So excited. Estimated date of completion... December 2013... {laughing out loud} Okay, seriously - hopefully by the summer. And, hopefully I don't stumble upon too many other ideas in the meantime to change my mind.


Wednesday, January 16, 2013

Before and After | The Dining Room Chairs

I have chairs! Okay so you may have snuck a peak at them in the DIY Prendant Lighting with Lampshade post the other day... but here they are up close and personal.


When the hubby built the new table, we were left with an eight-seater bar table. Without hesitation, my mom volunteered it to her home. We thought why not? We were done with it... but we get to keep two of the chairs for our island... and the deal was made. I'm not sure if she actually won out of this situation though. When we dropped off her table, she was left with two sets. So, I insisted we take her old one. Well, at least the chairs. I figured if we painted them up they would do just fine at our new table. So we did just that. (As for the table, the hubby is turning it into a desk!! Stay tuned for that post... it's a project still sitting on the back burner.)

Before:


After:


What do you think? Not bad? We are still getting used to having a "normal" height table and everything seems so tiny... or the space feels huge. I'm not too sure yet. Anyways, I'm saving my pennies for two wing back or upholstered chairs for the ends, like this one:


via


And when I say saving my pennies I mean it. Can you believe that these chairs are $400 each?? I mean obviously I'm not getting them, but I even saw other ones I like that are $1000 each... do people really pay that much for one dining room chair??

Oh to dream...

Anyways, those are the dining room chairs... we're still trying to decide if we like them.


Monday, January 14, 2013

DIY Pendant Lighting with Lampshades

When we were redoing, okay gutting our main floor, I had the perfect image for the lights I wanted over the island. There was just one problem - the $ price tag. The lights I wanted started at $160 each! If anyone knows me, they know I wouldn't spend that on a light no matter how much I loved it.

So, I got creative. (Please excuse all ceilings... I need to get them painted!)


diy pendant lighting with with lampshades by martha.anne


In fact, back in the summer I even took a picture with my phone of the exact fixture I bought so I could share my steal with you. Lets just say we did both lights for $60. Are you ready for it? Here goes.

So, here are the style I wanted:


Ballard Designs - $299


Placed like this:


Pinterest


In white with a silver post. (Can't find that picture?)

And here is what I have:


diy pendant lighting over kitchen island by martha.anne


Spaced like this:


diy pendant light with chrome / silver post and white lampshade by martha.anne


In white with a silver post :o)


diy pendant lighting for $30 by martha.anne


How did we do it? First, we bought two glass pendant light fixtures from Home Depot for $20 each, where the glass was removable.


Home Depot light fixture


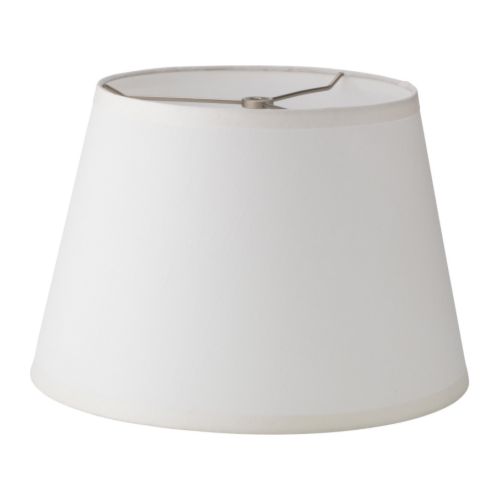
Then we bought the JONSBO lamp shades from Ikea for $10 each.


JONSBO lampshade from Ikea


First I removed the glass from the light fixture, then before the hubby installed it, slid the Ikea lamp shade down the post so that it would rest on the fixture. And, voila. Install and complete. Why pay over $300 when you can have these beauties for only $60. And... if you cut the lamp shade wire for easy on and off, you could also change out the shade to match seasonal decor!


(This post has been linked up on Setting For Four - http://www.settingforfour.com/2013/01/its-party-time-1-13-2013-linky-party.html and Creations by Kara - http://www.creationsbykara.com/2013/01/look-what-i-made-link-party-1-9-2013.html)